Raising ducklings can be a fun and rewarding experience for the whole family. To ensure their healthy growth, it’s crucial to provide them with a safe and warm environment, typically achieved by setting up a duck brooder.
A duck brooder serves as a safe haven for ducklings, protecting them from predators and providing the necessary warmth. In this guide, we’ll walk you through the steps to set up a suitable brooder for your ducklings, covering essential aspects such as temperature control, bedding, and water provision.
Key Takeaways
- Setting up a duck brooder is essential for raising healthy ducklings.
- A brooder provides a safe and warm environment.
- Temperature control is crucial in a duck brooder.
- Proper bedding and water provision are key to a successful brooder setup.
- Regular maintenance ensures the health and safety of the ducklings.
Understanding Duck Brooders and Their Importance

A duck brooder serves as a safe haven for ducklings, providing them with the warmth and protection they need to thrive. This specialized enclosure is designed to mimic the conditions that a mother duck would provide, ensuring the ducklings grow healthily.
What Is a Duck Brooder?
A duck brooder is essentially a nursery for ducklings, where they can be kept warm and safe until they are old enough to be moved to the main duck coop. It’s a controlled environment that protects them from predators and harsh weather conditions.
Key features of a duck brooder include a warm and draft-free space, adequate ventilation, and protection from potential threats. The brooder is typically equipped with a heat source, such as a heat lamp, to maintain a warm temperature suitable for the ducklings’ growth.
Why Proper Brooding Is Essential for Duckling Health
Proper brooding is crucial for the health and well-being of ducklings. It significantly reduces the risk of disease and stress, which are common challenges faced by young ducklings. A well-managed brooder helps in regulating their body temperature, which is vital during the initial weeks of their life.
Moreover, a duck brooder allows for better monitoring of the ducklings’ health, enabling early detection of any issues. By providing a safe and healthy start, you can significantly improve the chances of raising robust and healthy ducks.
Planning Your Duck Brooder Setup
Before bringing home your ducklings, it’s essential to plan your duck brooder setup carefully. A well-prepared brooder ensures a healthy and safe environment for your ducklings to grow.
Location Considerations
Choosing the right location for your duck brooder is crucial. The area should be draft-free, dry, and away from direct sunlight. Consider the proximity to your home to ensure easy monitoring and maintenance.
- Keep the brooder away from pets and other animals that might disturb the ducklings.
- Ensure the location is easily accessible for cleaning and feeding.
- Avoid areas prone to moisture accumulation to prevent health issues.
Timing and Preparation
Ideally, you should set up your brooder before you ever bring your ducklings home. Assemble all the necessary supplies and turn on the heater to warm the area.
Key preparation steps include:
- Assembling all the necessary equipment, such as a brooder box, heat lamp, and bedding.
- Testing the temperature to ensure it’s suitable for the ducklings.
- Preparing a feeding and watering system that’s safe and accessible.
Budget Planning
Budgeting for your duck brooder setup is important to ensure you can provide the necessary care without financial strain. Consider the costs of the brooder box, heating, bedding, and feeding equipment.
Some cost-effective DIY duck brooder ideas can help reduce initial expenses. However, prioritize the quality and safety of the setup to protect your ducklings’ health.
- Research and compare prices for different brooder supplies.
- Consider repurposing household items for the brooder setup.
- Plan for ongoing expenses, such as feed and bedding replacements.
Essential Duck Brooder Equipment Checklist

Setting up a duck brooder requires careful consideration of the essential equipment needed to ensure the health and well-being of your ducklings. A well-stocked brooder provides the necessary conditions for ducklings to grow strong and healthy.
Basic Equipment Needs
The foundation of a successful duck brooder lies in its basic equipment. Heaters and thermometers are crucial for maintaining the optimal temperature. Ducklings require a warm environment, especially in their first few weeks. A heat lamp or heat mat can be used to achieve the desired temperature, while a thermometer ensures that it remains consistent.
Waterers and feeders are also essential. The waterer should be designed to prevent drowning and spills, while the feeder should be easily accessible to the ducklings. It’s advisable to use a feeder that can be adjusted or raised as the ducklings grow.
Optional but Helpful Items
While the basic equipment covers the fundamental needs, there are several optional items that can enhance the brooder’s functionality and the ducklings’ comfort. Brooder plates or duck brooder plates can provide a safe space for ducklings to warm up without the risk of getting too close to heat sources. Additionally, supplements can be given to ensure the ducklings receive a balanced diet.
Another helpful item is a duck brooder kit, which often includes a comprehensive set of equipment designed to work together seamlessly. These kits can simplify the setup process and ensure that all necessary items are included.
Where to Purchase Duck Brooder Supplies
Duck brooder supplies can be found at various agricultural supply stores, online marketplaces, and sometimes even in general pet supply stores. When purchasing online, it’s essential to read reviews and check the product specifications to ensure they meet your needs. For specialized items like duck brooder plates or specific types of feeders, online retailers may offer a wider selection.
When setting up your duck brooder, it’s crucial to consider the specific needs of your ducklings, including the right duck feeder and waterer tips to prevent accidents and ensure cleanliness. Maintaining the correct duck brooder temperature is also vital for the health of the ducklings.
Choosing the Right Duck Brooder Container

When it comes to setting up a duck brooder, one of the most important decisions is choosing the right container. The container serves as the home for your ducklings during their most vulnerable stage, providing them with the necessary protection and environment to grow.
The ideal duck brooder container should be safe, escape-proof, and well-ventilated. It should also be easy to clean and maintain. There are several options available, ranging from commercial duck brooder boxes to repurposed containers and kiddie pool duck brooders.
Commercial Duck Brooder Boxes
Commercial duck brooder boxes are specifically designed for raising ducklings. They are usually made of durable materials and come with features such as adjustable height, easy cleaning access, and ventilation systems. These boxes are a convenient option, as they are designed with the needs of ducklings in mind.
Some popular commercial duck brooder boxes include those with built-in heat lamps and adjustable ventilation. While they can be more expensive than DIY options, they offer a hassle-free solution for those new to raising ducklings.
Repurposed Containers
For those on a budget or looking for a DIY solution, repurposed containers can make excellent duck brooder containers. Options include large Rubbermaid bins, stock tanks, or even a bathtub. When repurposing a container, it’s essential to ensure it’s clean, dry, and free from any hazardous materials.
Repurposing containers not only saves money but also allows for creativity in designing the brooder. However, it’s crucial to modify the container to meet the needs of ducklings, such as adding ventilation and a heat source.
Kiddie Pool Duck Brooder Options
Kiddie pools can serve as an effective and spacious duck brooder container, especially for larger numbers of ducklings. They provide ample space for movement and can be easily cleaned. When using a kiddie pool as a brooder, ensure it’s placed in a safe location, protected from predators and drafts.
To set up a kiddie pool duck brooder, add a heat source, such as a heat lamp, and ensure proper ventilation. Bedding material like straw or pine shavings should be used to keep the environment dry and comfortable for the ducklings.
Regardless of the container chosen, it’s vital to monitor the environment closely, ensuring it remains clean, dry, and at the right temperature for the ducklings. Regular maintenance and checks will help prevent health issues and ensure the ducklings thrive.
Duck Brooder Size Requirements

Adequate space is essential for ducklings, making the size of the brooder a critical factor in their development. Providing enough room for your ducklings to move around is crucial for their health and well-being.
Space Needs Based on Duckling Numbers
The size of your duck brooder should be determined based on the number of ducklings it will house. A general rule of thumb is to provide a minimum of three square feet of space per duckling. This ensures that each duckling has sufficient room to move, stretch, and engage in natural behaviors without overcrowding.
| Number of Ducklings | Minimum Brooder Size (sq. ft.) |
|---|---|
| 5 | 15 |
| 10 | 30 |
| 15 | 45 |
Expanding Your Brooder as Ducklings Grow
As your ducklings grow, it’s essential to expand their brooder to accommodate their increasing size and activity level. Regularly assess the brooder’s capacity and consider expanding the duck brooder as needed to prevent overcrowding.
One strategy for expanding your brooder is to use modular or adjustable enclosures that can be enlarged as your ducklings mature. This approach allows you to start with a smaller brooder for young ducklings and gradually increase the size as they grow.
Multi-Level Brooder Designs
For larger or more elaborate setups, consider implementing multi-level brooder designs. These designs can maximize space by providing multiple layers or tiers within the brooder, giving ducklings more room to explore and exercise.
When designing a multi-level brooder, ensure that the transitions between levels are safe and accessible for the ducklings. Ramps or gentle slopes can be used to connect different levels, minimizing the risk of injury.
Creating the Perfect Duck Brooder Temperature Environment

Maintaining an optimal temperature environment in the duck brooder is essential for raising healthy ducklings. The temperature requirements for ducklings change as they grow, making it crucial to monitor and adjust the brooder temperature accordingly.
Duck Brooder Temperature Chart by Age
Ducklings require a specific temperature range that decreases as they mature. For the first week, the brooder should be set at around 90°F. Thereafter, the temperature can be decreased by 1°F per day or 7°F per week until the ducklings are at least 7 weeks old.
| Age (Weeks) | Temperature (°F) |
|---|---|
| 1 | 90 |
| 2 | 83 |
| 3 | 76 |
| 4 | 69 |
| 5 | 62 |
| 6 | 55 |
| 7 | 48 or room temperature |
Heat Lamp Setup and Safety
A heat lamp is a common method for maintaining the required temperature in a duck brooder. When setting up a heat lamp, it’s crucial to ensure it’s securely positioned to avoid any fire hazards. The lamp should be placed at a safe distance from the ducklings and any flammable materials.
Key Safety Considerations:
- Secure the heat lamp to prevent it from tipping over.
- Keep the heat lamp at a safe distance from the ducklings and flammable materials.
- Monitor the temperature closely to avoid overheating.
Alternative Heating Options
While heat lamps are popular, there are alternative heating options available for duck brooders, such as heat mats and radiant heaters. These alternatives can offer safer and more efficient ways to maintain the desired temperature.
When choosing an alternative heating method, consider the size of your brooder, the number of ducklings, and the specific heating needs.
Selecting the Best Bedding for Your Duck Brooder

When setting up a duck brooder, one of the most important decisions you’ll make is selecting the appropriate bedding. The bedding in your duck brooder is not just about comfort; it’s a critical factor in maintaining the health and hygiene of your ducklings.
Bedding Material Options
There are several bedding materials you can use for your duck brooder, each with its pros and cons. Pine shavings are a popular choice due to their absorbency and availability. Other options include corn cobs and old towels, which can be cost-effective and readily available.
| Bedding Material | Absorbency | Cost | Ease of Cleaning |
|---|---|---|---|
| Pine Shavings | High | Moderate | Easy |
| Corn Cobs | Moderate | Low | Moderate |
| Old Towels | Low | Low (if reused) | Easy |
Deep Litter Method for Duck Brooders
The deep litter method involves maintaining a thick layer of bedding material that composts over time, providing a dry and relatively clean environment for your ducklings. This method requires regular stirring and monitoring to prevent ammonia buildup.
Keeping Bedding Dry and Clean
Regardless of the bedding material you choose, keeping it dry and clean is paramount. Regularly spot-cleaning soiled areas and completely changing the bedding every few weeks can help maintain a healthy environment.
Eco-Friendly Bedding Alternatives
For those looking for eco-friendly options, materials like recycled paper, hemp, or straw can be viable alternatives. These materials are not only better for the environment but can also provide a comfortable and dry surface for your ducklings.
By carefully selecting and maintaining the bedding in your duck brooder, you can significantly improve the health and well-being of your ducklings.
Water Management in Duck Brooders

The key to a successful duck brooder setup lies in effective water management. Ducks need access to clean water at all times, and managing this water effectively is crucial for the health and well-being of the ducklings.
Waterer Types and Placement
Choosing the right waterer is vital for duck brooders. There are various types of waterers available, including shallow dishes and specialized duckling waterers that prevent drowning and spills. The placement of waterers is also important; they should be positioned in a way that prevents bedding from getting wet and reduces the risk of ducklings getting soaked.
Tips for Waterer Placement: Place waterers on a tray or mat that can catch spills, and ensure they are stable to prevent tipping over.
Preventing Wet Conditions
Wet conditions in a duck brooder can lead to health issues such as hypothermia and the growth of harmful bacteria. To prevent this, it’s essential to use waterers that minimize spillage and to regularly check and clean the brooder.
- Use waterers with a wide base to prevent tipping.
- Place absorbent material around the waterer to catch spills.
- Regularly inspect the brooder for damp areas.
Safe Swimming Options for Ducklings
As ducklings grow, they need opportunities for swimming to develop properly. Providing a safe swimming area within or near the brooder is essential. This can be a shallow, duckling-safe pool or a designated swimming area that is easy to clean and free from hazards.
Water Sanitation Practices
Keeping the water clean is crucial for the health of ducklings. Regularly changing the water, cleaning the waterers, and ensuring that the water is free from contaminants are essential practices. Adding a water sanitizer can also help maintain water quality.
Water Sanitation Tips: Change the water daily, and clean the waterer with a mild detergent. Consider using a water test kit to check for bacterial contamination.
Feeding Systems for Duck Brooders

The feeding system in a duck brooder plays a vital role in ensuring the ducklings receive the necessary nutrients for growth. A well-designed feeding system not only promotes healthy growth but also helps in maintaining the cleanliness of the brooder.
Feeder Types and Placement
Choosing the right feeder is crucial for efficient feeding. For ducklings, feeders that are easy to clean and prevent waste are ideal. Hanging feeders or tray feeders are often recommended as they help keep the feed clean and reduce waste. Placement of feeders near the ducklings’ resting area but away from waterers can help prevent wet feed and reduce the risk of disease.
According to expert advice, “Using feeders that minimize waste and keep the feed dry is essential for the health of the ducklings.”
This approach not only saves feed but also contributes to a cleaner brooder environment.
Duckling Starter Feed Requirements
Ducklings require a starter feed that is rich in protein (around 20-22%) to support their rapid growth. While chick starter feed can be used in a pinch, ducklings have a higher niacin requirement than chicks. Therefore, if possible, using a waterfowl or duck starter feed is recommended.
| Feed Type | Protein Content | Niacin Content |
|---|---|---|
| Duck Starter Feed | 20-22% | High |
| Chick Starter Feed | 20-22% | Lower than duck feed |
Supplements and Treats
While starter feed provides the necessary nutrients, supplements and treats can be given in moderation. Treats such as mealworms or finely chopped greens can be healthy additions. However, it’s crucial to avoid over-supplementation, which can lead to nutritional imbalances.
Niacin supplements are particularly important for ducklings due to their high niacin requirements. However, always consult with a veterinarian before adding any supplements to ensure they are necessary and to determine the correct dosage.
Feeding Schedule and Amounts
Ducklings need to be fed frequently, especially in the first few weeks. A feeding schedule that includes feeding them 3-4 times a day can help ensure they have constant access to feed. The amount of feed will depend on the age and number of ducklings, typically ranging from 1-2 pounds of feed per duckling over the first few weeks of life.
By carefully planning the feeding system, including the type of feeders, starter feed, supplements, and feeding schedule, you can help ensure the health and well-being of your ducklings.
DIY Duck Brooder Ideas and Plans

With a little creativity, you can build a DIY duck brooder that meets all your ducklings’ needs without breaking the bank. This approach not only saves money but also allows you to customize the brooder to your specific needs.
Simple Homemade Duck Brooder Designs
One of the simplest ways to create a homemade duck brooder is by using a large plastic storage box. By cutting a hole in the floor and adding a heat lamp, you can create a warm and safe environment for your ducklings.
Key Features to Consider:
- Ventilation: Ensure proper airflow to keep the environment healthy.
- Temperature Control: Use a thermometer to monitor and adjust the temperature as needed.
- Space: Provide enough room for your ducklings to move around comfortably.
Budget-Friendly Options
Creating a budget-friendly duck brooder involves repurposing materials you might already have at home. For example, an old dresser or a large wooden crate can be converted into a brooder with some creativity.
| Material | Cost | Repurposed Use |
|---|---|---|
| Large Plastic Storage Box | $20-$50 | Brooder Container |
| Old Dresser or Crate | $0 (if you already have it) | Brooder or Multi-Level Brooder |
| Heat Lamp | $15-$30 | Heating Source |
Advanced DIY Brooder Features
For those who want to take their DIY duck brooder to the next level, consider adding advanced features such as automated feeding systems or temperature control units. These features can enhance the health and well-being of your ducklings.
Repurposing Household Items
Repurposing household items is not only budget-friendly but also environmentally conscious. Consider using old furniture, plastic bins, or even cardboard boxes to create a unique and functional duck brooder.
By following these DIY duck brooder ideas and plans, you can create a safe, healthy, and nurturing environment for your ducklings without straining your budget.
Maintaining Duck Brooder Cleanliness

Maintaining a clean duck brooder is crucial for the health and well-being of your ducklings. Ducklings can be messy, so regular cleaning is essential to keep the brooder clean and dry. A clean environment helps prevent the spread of diseases and keeps your ducklings healthy.
Daily Maintenance Tasks
Daily maintenance is key to a clean duck brooder. This includes removing soiled bedding, cleaning feeders and waterers, and ensuring the brooder is free from waste. Use a disinfectant safe for poultry to clean all surfaces.
- Check and clean feeders and waterers daily.
- Remove soiled bedding and replace it with fresh bedding.
- Inspect the brooder for any signs of disease or stress.
Weekly Cleaning Routine
A weekly cleaning routine involves a deeper clean of the brooder. This includes washing the brooder with a mild detergent, drying it thoroughly, and replacing all bedding. It’s also a good opportunity to inspect the heating elements and other equipment.
- Remove all ducklings to a safe area.
- Take out all bedding and disposable items.
- Wash the brooder with mild detergent and dry it.
- Replace bedding and return the ducklings.
Mess-Free Brooder Design Tips
Designing a mess-free duck brooder can significantly reduce cleaning efforts. Consider using a brooder with a solid bottom to prevent bedding from being kicked out. Also, using feeders and waterers designed to minimize spillage can help.
| Feature | Benefit |
|---|---|
| Solid bottom brooder | Reduces bedding loss |
| Anti-spill feeders and waterers | Minimizes waste and mess |
| Easy-to-clean surfaces | Simplifies daily and weekly cleaning |
Odor Control Strategies
Controlling odors in a duck brooder is crucial for maintaining a healthy environment. Regular cleaning, proper ventilation, and using odor-absorbing bedding can help. Consider adding a ventilation system to improve air quality.
By following these tips and maintaining a regular cleaning schedule, you can ensure your duck brooder remains clean and healthy for your ducklings.
Monitoring Duckling Health in the Brooder

Monitoring duckling health in the brooder is a critical task for any duck breeder. Ensuring that ducklings are healthy and thriving is essential for their survival and growth into strong, productive ducks.
Signs of Healthy Ducklings
Healthy ducklings exhibit certain characteristics that are easy to recognize. They should be active and alert, with bright, open eyes. Their feathers should be clean and fluffy, and they should have a robust appetite. Labored breathing or lethargy are signs of potential health issues.
Common Health Issues to Watch For
Ducklings are susceptible to various health issues, including:
- Respiratory infections, often caused by poor ventilation or drafts
- Hypothermia, resulting from inadequate heating
- Dehydration, which can occur if waterers are not clean or if ducklings are not drinking enough
- Pastinosis or other diseases related to nutritional deficiencies
Being aware of these potential health issues allows breeders to take preventive measures and intervene early if problems arise.
When to Consult a Veterinarian
If ducklings show signs of illness, such as labored breathing, lethargy, or loss of appetite, it’s crucial to consult a veterinarian experienced in caring for poultry. Early intervention can significantly improve outcomes.
Niacin Requirements for Ducklings
Niacin, or Vitamin B3, is particularly important for ducklings as it plays a critical role in their growth and development. A deficiency can lead to conditions such as bowed legs. Ensuring adequate niacin through diet or supplements is vital.
Duck breeders should be vigilant about the health of their ducklings, monitoring for signs of illness and taking proactive steps to prevent common health issues. By doing so, they can ensure the well-being of their flock and promote healthy growth and development.
Indoor vs. Outdoor Duck Brooder Setups
Duck brooder setups can be broadly categorized into indoor and outdoor configurations, each with its own set of advantages and challenges. The choice between these two options depends on several factors, including climate, available space, and the specific needs of your ducklings.
Benefits and Challenges of Indoor Brooders
Indoor duck brooders offer better control over temperature and humidity, which is crucial for the health and development of ducklings. They provide a safe and secure environment, protected from predators and harsh weather conditions. However, indoor brooders require careful planning to ensure adequate ventilation and sufficient space.
Key benefits of indoor brooders include:
- Climate control
- Predator protection
- Easy monitoring
Despite these advantages, indoor brooders can be challenging if not properly managed. Ensuring adequate space and preventing overcrowding are critical to the success of an indoor brooder.
Outdoor Brooder Requirements
Outdoor duck brooders, on the other hand, can provide more space and natural light, which can be beneficial for ducklings. However, they require careful consideration of factors such as predator protection, weather conditions, and accessibility for cleaning and maintenance.
Outdoor brooders necessitate:
- Sturdy fencing to prevent escape and predation
- Adequate shelter from the elements
- Regular monitoring of weather conditions
Predator-Proofing Your Duck Brooder
Regardless of whether you choose an indoor or outdoor brooder, predator-proofing is essential. This involves using secure enclosures, covering ventilation holes with hardware cloth, and ensuring that the brooder is placed in a safe location.
Predator-proofing measures include:
- Using strong materials for the brooder
- Securing the brooder with locks or latches
- Regularly inspecting the brooder for vulnerabilities
Seasonal Considerations
Seasonal changes can impact the conditions within your duck brooder. It’s essential to be prepared to adjust the brooder’s setup accordingly. For example, during hot weather, ensuring adequate ventilation and shade is crucial, while in cold weather, maintaining a warm environment is vital.
Seasonal adjustments may involve:
- Adjusting heating or cooling as needed
- Modifying ventilation to accommodate changing weather
- Ensuring the brooder remains dry and clean
Transitioning Ducklings from Brooder to Outdoor Housing
When ducklings are ready, relocating them from the brooder to outdoor housing requires a thoughtful and gradual process. This transition is crucial for their development and preparation for adult life.
Timing the Transition
The ideal time to transition ducklings to outdoor housing depends on several factors, including their age, feathering, and the outdoor temperature. Generally, ducklings can be moved outdoors when they are fully feathered, which usually occurs around 6-8 weeks of age.
Key factors to consider when timing the transition:
- Age and feather development
- Outdoor temperature and weather conditions
- Predator protection and safety measures
Gradual Acclimation Process
To ensure a smooth transition, it’s essential to acclimate ducklings gradually to outdoor conditions. Start by allowing them to spend short periods outside under close supervision, gradually increasing the duration over time.
Steps for gradual acclimation:
- Begin with short outdoor sessions (1-2 hours) in a safe, enclosed area.
- Monitor ducklings’ behavior and adjust the acclimation schedule as needed.
- Gradually increase outdoor time over the course of 7-10 days.
Integrating with Existing Flocks
If you have an existing flock, integrating new ducklings requires careful planning to prevent stress and conflict. Introduce ducklings to the flock gradually, starting with visual introductions, then progressing to supervised interactions in a neutral area.
| Integration Step | Description |
|---|---|
| Visual Introduction | Allow ducklings and existing flock to see each other before direct contact. |
| Supervised Meeting | Introduce ducklings to the flock in a neutral, controlled environment. |
| Full Integration | Once ducklings are accepted, integrate them fully into the flock. |
Creating a Transition Area
A transition area or “run” can serve as an intermediary space between the brooder and outdoor housing, providing a safe environment for ducklings to acclimate to outdoor conditions before being introduced to the main flock or larger outdoor area.
By following these guidelines, you can ensure a successful transition of your ducklings from the brooder to outdoor housing, setting them up for a healthy and thriving life.
Setting Up Your Duck Brooder for Success
Setting up a duck brooder requires careful planning and attention to detail to ensure the health and well-being of the ducklings. By following the guidelines outlined in this article, you can create a safe and nurturing environment for your ducklings to grow and thrive.
A successful duck brooder setup is crucial for raising healthy ducklings. This involves choosing the right equipment, maintaining a clean and dry environment, and providing a suitable temperature and feeding system. By getting these elements right, you can significantly improve your chances of duck brooder success.
As you prepare to raise your ducklings, remember that setting up a duck brooder is just the first step. Ongoing care and attention are necessary to ensure the continued health and well-being of your flock. With proper care and management, your ducklings will grow into healthy and productive ducks.
FAQ
What is a duck brooder and why is it necessary?
A duck brooder is a controlled environment designed to provide a safe and warm space for ducklings to grow. It’s necessary because ducklings require specific conditions to thrive, including warmth, proper feeding, and protection from predators.
What are the essential equipment needs for a duck brooder?
The essential equipment includes heaters, thermometers, feeders, and waterers. These provide the necessary warmth, monitor temperature, and supply food and water to the ducklings.
How do I choose the right container for my duck brooder?
You can choose from commercial brooder boxes, repurposed containers, or kiddie pools. Consider factors like space, ventilation, and ease of cleaning when making your decision.
How big should my duck brooder be?
The size of the brooder depends on the number of ducklings. A general rule is to provide enough space so that the ducklings can move around comfortably without overcrowding, typically starting with at least 0.5 to 1 square foot per duckling.
What temperature should I maintain in the duck brooder?
The temperature requirements vary by age. Generally, start with a temperature around 90°F (32°C) for the first week and decrease by 5°F (2.8°C) each subsequent week until you reach around 70°F (21°C), or until the ducklings are fully feathered.
What bedding material is best for a duck brooder?
Popular bedding materials include pine shavings, straw, and hemp. The deep litter method, where you add new bedding on top of the old, can be effective for maintaining cleanliness.
How do I manage water in the duck brooder?
Use waterers that are designed to minimize spillage, and place them in a way that prevents the ducklings from getting wet. Regularly clean and sanitize the waterers to prevent disease.
What are the feeding requirements for ducklings in a brooder?
Ducklings require starter feed that is high in protein. Use feeders that are easy for them to access, and ensure they always have fresh water and food available.
Can I make my own duck brooder?
Yes, you can create a DIY duck brooder using household items or simple designs. This can be a cost-effective and creative way to provide a suitable environment for your ducklings.
How often should I clean the duck brooder?
Daily maintenance involves removing soiled bedding and waste, while a deeper clean should be done weekly. Regular cleaning helps prevent disease and keeps the environment healthy.
How do I monitor the health of my ducklings in the brooder?
Watch for signs of healthy ducklings, such as active behavior and clean feathers. Be aware of common health issues like respiratory problems or niacin deficiency, and consult a veterinarian if you have concerns.
When should I transition my ducklings from the brooder to outdoor housing?
The timing depends on the weather and the ducklings’ age and feathering. Generally, you can start transitioning them when they are fully feathered and the weather is warm enough, gradually acclimating them to outdoor conditions.
Conclusion of: How to Set Up a Duck Brooder
When you begin planning a Duck Brooder, you’re laying the groundwork for healthy, happy ducklings. A good Duck Brooder ensures proper warmth, safety, cleanliness, and growth. In this guide, I’ll walk you through each essential step to set up your duck brooder from scratch, with clear, practical detail for beginners. The USDA offers additional poultry care guidelines here.
Choosing the Right Duck Brooder Structure
Every effective Duck Brooder starts with a suitable enclosure. Many beginners use plastic storage tubs, kiddie pools, or wooden boxes. These containers offer easy cleaning and enough space for early growth. Experts recommend about one-third square foot per duckling at arrival, expanding quickly as they grow—from around 1 sq ft to 3 sq ft per bird over time. Avoid sharp corners; round them off with tape or cardboard to prevent injuries. Learn more about space requirements from the University of Minnesota Extension.
Picking Suitable Bedding for Your Duck Brooder
Inside your Duck Brooder, bedding matters. Pine shavings (2–4 inches deep) are absorbent and commonly used. Avoid cedar shavings—they emit fumes harmful to ducklings’ respiratory systems. Another option: an absorbent base of newspaper or puppy pads topped with rubber shelf liner or towels—this method offers grip and easy cleanup, as recommended by seasoned backyard duck raisers. The Humane Society provides bedding safety tips here.
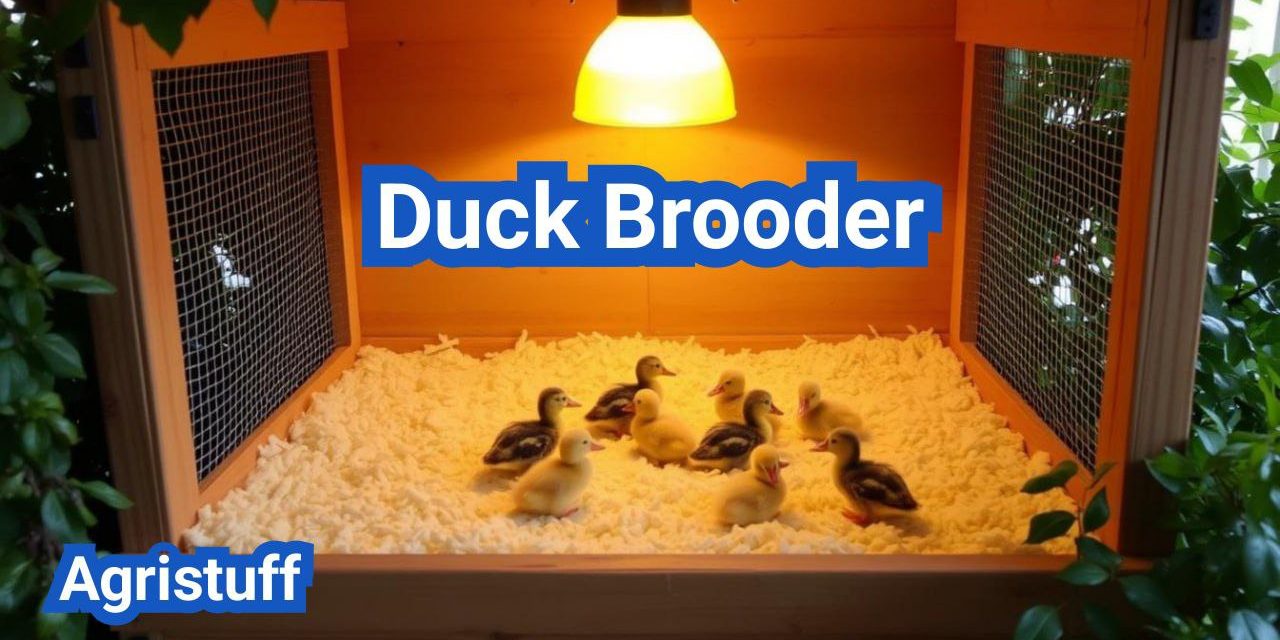
Installing a Reliable Heat Source in the Duck Brooder
A critical component of the Duck Brooder is consistent heat. Ducklings can’t regulate body temperature for the first few weeks. A heat lamp (125–250 W) hung about 18 inches above the floor aims for 90–95 °F at ground level in week one, then reduced by 5 °F each week until around 70 °F. Alternatively, brooder plates like eco-glow simulate a mother duck’s warmth—allowing ducklings to move off heat as needed. Use a thermometer at duckling level to monitor temperature changes. Cornell University’s poultry science team explains heat requirements here.
Arranging Feeder and Appropriate Feed in the Duck Brooder
Every Duck Brooder must include feeder placement. Provide a waterfowl starter feed containing 20–22% protein for the first two weeks, then transition to grower feed at 17–19% protein. Place the feeder near the waterer to enable drinking while feeding and minimize choking risks. Some starter feeds float, encouraging natural dabbling behavior. The American Poultry Association discusses feed types here.
Providing Clean Water in the Duck Brooder
Ducklings require constant, clean water in their Duck Brooder. They love to splash, so water setups must prevent drowning while still deep enough for them to dip heads and clear nasal passages. Use heavy, stable waterers elevated off bedding or placed over drip trays to capture spills. Avoid accessible pools until they can swim safely (about 5–6 weeks, once waterproof oils develop). Supervise any bath time indoors to prevent chilling. The Poultry Extension Collaborative covers water safety here.
Managing Cleanliness in Your Duck Brooder
Since ducklings make a mess, the design and bedding of the Duck Brooder must allow quick cleaning. Using puppy pads, trays, and liner layers makes daily swaps tidy. Some backyard keepers maintain two identical brooders—one in use, the other being cleaned and dried outdoors; they rotate ducklings each morning for efficient sanitation. The CDC shares sanitation best practices here.
Allowing Space and Proper Ventilation in the Duck Brooder
Your Duck Brooder should prevent overcrowding. Overcrowding increases humidity, smells, and disease risk. Aim for sufficient floor space so ducklings can move freely, eat, drink, and rest without crowding. Position the brooder in a draft‑free, warm, and predator‑proof location, ideally near indirect natural light but away from windows that create drafts. Michigan State University Extension discusses ventilation here.
Monitoring Behavior Inside the Duck Brooder
Good caretakers of a Duck Brooder observe duckling behavior. If ducklings huddle tightly under heat and peep, it’s too cold. If they spread out and avoid the heat lamp, it’s too hot. Ideal: ducklings eating, drinking, exploring the brooder evenly. This balance indicates the right temperature and setup. The Merck Veterinary Manual explains duckling behavior here.
Transitioning Out of the Duck Brooder
Most ducklings are ready to leave the Duck Brooder between 7 and 9 weeks, when fully feathered. You can offer supervised shallow puddle or pool time starting at one week to encourage waterproofing and natural behaviors. Gradually acclimate them to outdoor housing over several days before full transition. Oregon State University’s poultry guide covers transitioning here.
Safety Tips for Using the Duck Brooder
Safety in your Duck Brooder is paramount. Secure the heat lamp well to prevent tipping or fire hazards. Many experienced duck raisers double-check mounting security. Always avoid placing plastic or bedding too close to hot bulbs. Ensure ventilation to avoid moisture buildup but prevent drafts. The National Fire Protection Association shares heat lamp safety here.
Sample Day-to-Day Brooder Maintenance Schedule
Each day in a Duck Brooder, check water cleanliness and refill, change bedding as needed, monitor temperature and duckling behavior, spot clean droppings, and swap trays if using layered liners. Rotate brooders weekly if possible to keep conditions fresh and reduce risk of moisture build‑up and odor. The University of Florida’s poultry program outlines daily care here.
Summary Checklist for Your Duck Brooder Setup
- Spacious, draft‑free enclosure
- Safe, absorbent bedding (pine shavings, liners, towels)
- Reliable heat source (lamp or brooder plate) with thermometer
- Balanced feeding and clean water setup
- Simple, layered bedding for fast cleaning
- Adequate airflow and duckling movement space
- Regular monitoring for behavior and cleanliness
Final Thought
Setting up a Duck Brooder properly takes planning, attention, and care. By choosing the right enclosure, bedding, heat, water, feed, and cleaning routine, you’ll create a healthy environment that helps your ducklings thrive. Observe their behavior closely and adjust as needed—this responsiveness will guide you to success. With proper setup and routine, your duck brooder becomes the foundation of a joyful, clean, and educational duck‑raising experience. For more duck-raising resources, visit the Livestock Conservancy.


