Understanding the fundamentals of chicken incubation is crucial for successful hatching. The process involves maintaining precise temperature and humidity levels, as well as regular egg turning.
To achieve optimal results, it’s essential to grasp the basics of incubator operation. This includes setting the right temperature and humidity levels and understanding the importance of egg turning.
Troubleshooting common issues is also vital to ensure a healthy hatch. By understanding the basics of chicken incubation, you can identify and address potential problems early on.
Key Takeaways
- Maintaining precise temperature and humidity levels is crucial for successful chicken incubation.
- Regular egg turning is essential to prevent embryonic adhesion.
- Understanding incubator operation is vital for optimal results.
- Troubleshooting common issues can help ensure a healthy hatch.
- Proper incubation techniques can significantly improve hatch rates.
Choosing the Right Chicken Incubator for Your Needs

The journey to successful chicken incubation begins with selecting the appropriate incubator for your specific needs. With various types and models available, understanding the differences and features of chicken incubators is crucial for achieving a high hatch rate.
Small vs. Commercial Incubators
When deciding on a chicken incubator, one of the first considerations is whether you need a small or commercial-sized unit. Small incubators are ideal for hobbyists or backyard chicken enthusiasts, typically accommodating fewer eggs. In contrast, commercial incubators are designed for large-scale operations, offering higher capacity and often more advanced features.
The choice between small and commercial incubators depends on your specific needs, including the number of eggs you plan to incubate and the space available for the incubator.
Forced Air vs. Still Air Models
Another critical distinction is between forced air and still air incubators. Forced air models use a fan to circulate air, ensuring a uniform temperature throughout the incubator. This can lead to more consistent hatching results. Still air incubators, on the other hand, rely on natural air circulation, which can result in temperature variations.
Forced air incubators are generally recommended for their ability to maintain a consistent temperature, a critical factor in successful incubation.
Manual vs. Automatic Features
The level of automation is another key consideration. Automatic chicken egg incubators offer features like automatic egg turning and temperature control, reducing the need for manual intervention. Manual incubators, while often less expensive, require more labor to turn eggs and monitor conditions.
For those new to incubation or with limited time to dedicate to daily tasks, automatic features can significantly simplify the process.
Popular Brands and Models in the US Market
In the US, several brands stand out for their quality and reliability. When searching for the best chicken incubator or top-rated chicken incubator, consider models from reputable manufacturers known for their performance and customer support.
Some popular options include automatic chicken egg incubators that offer advanced features like digital temperature control and humidity management, making them suitable for both beginners and experienced breeders.
When purchasing, you might also want to check reviews and ratings, especially on platforms like Amazon, to find the backyard chicken egg incubator that best suits your needs.
Essential Components of a Quality Chicken Incubator

Understanding the essential components of a chicken incubator is vital for anyone looking to hatch eggs successfully. A quality incubator is designed to mimic the conditions necessary for chicken eggs to develop properly, and its components work together to achieve this goal.
Heating Elements and Temperature Control Systems
The heating element is a critical component of any chicken incubator, as it provides the necessary warmth for the developing embryos. Temperature control systems are equally important, as they ensure that the temperature remains consistent throughout the incubation period. Modern incubators often come with digital temperature control, allowing for precise adjustments.
Humidity Regulation Features
Maintaining the right humidity levels is crucial for successful incubation. Incubators with effective humidity regulation features can help prevent dehydration of the embryos and ensure proper development. Some models include automatic humidity adjustment, while others require manual intervention.
Egg Turning Mechanisms
Turning eggs is essential to prevent the embryos from sticking to the shell and to ensure even development. Egg turning mechanisms automate this process, reducing the workload for the incubator user. The frequency and angle of turning can significantly impact the success of the hatch.
Ventilation and Airflow Design
Adequate ventilation is necessary to provide oxygen to the developing embryos and to remove carbon dioxide. The ventilation and airflow design in a chicken incubator helps maintain a healthy environment inside the incubator. Proper ventilation also helps regulate temperature and humidity.
| Component | Function | Importance |
|---|---|---|
| Heating Elements | Provide warmth for embryo development | High |
| Temperature Control Systems | Maintain consistent temperature | High |
| Humidity Regulation Features | Maintain optimal humidity levels | High |
| Egg Turning Mechanisms | Automate egg turning for even development | High |
| Ventilation and Airflow Design | Provide oxygen and remove CO2 | High |
Setting Up Your Chicken Incubator for First Use

Getting your chicken incubator ready for its first use involves several critical steps that ensure a successful hatching experience. Proper setup is crucial for maintaining the delicate environment required for the development of chicken embryos.
Choosing the Optimal Location
The location of your chicken incubator can significantly impact its performance. It’s essential to place the incubator in a room with a stable temperature, away from direct sunlight and drafts. Avoid areas near windows, doors, or air conditioning vents to minimize temperature fluctuations.
Key Considerations for Incubator Placement:
- Avoid direct sunlight to prevent overheating
- Keep away from drafts to maintain stable temperature
- Ensure easy access for monitoring and maintenance
- Place on a stable surface to prevent vibrations
Initial Cleaning and Sanitizing
Before first use, it’s crucial to clean and sanitize your chicken incubator thoroughly. This step removes any manufacturing residues and reduces the risk of contamination. Use a mild detergent and warm water to clean all surfaces, followed by a sanitizing solution. Rinse thoroughly and let it dry completely before proceeding.
Tip: Always refer to your incubator’s manufacturer instructions for specific cleaning recommendations.
Pre-Heating and Stabilization Period
Pre-heating your incubator is essential to ensure it reaches a stable operating temperature. Turn on the incubator and let it run for at least 24 hours before adding eggs. This period allows the incubator to stabilize and helps identify any potential issues with temperature control.
| Incubator Component | Pre-Heating Check | Expected Outcome |
|---|---|---|
| Temperature Control | Set to desired temperature | Stable temperature reading |
| Humidity System | Filled with distilled water | Correct humidity level |
| Turning Mechanism | Tested for proper function | Smooth, quiet operation |
Testing All Functions Before Adding Eggs
Before introducing eggs to the incubator, test all its functions to ensure they’re working correctly. Check the temperature, humidity, and egg turning mechanisms. Verify that the incubator can maintain the set temperature and humidity levels.
By following these steps, you’ll be well-prepared for a successful incubation experience. Proper setup and testing of your chicken incubator lay the foundation for healthy chick development.
Optimal Temperature Settings for Successful Incubation

Temperature control is a critical factor in determining the success of your chicken incubation process. The temperature setting in your incubator directly affects the development and viability of the embryos. Therefore, understanding the optimal temperature settings and how to maintain them is crucial.
Temperature Requirements for Different Incubator Types
Different types of incubators have varying temperature requirements. Forced air incubators, which circulate air throughout the incubator, typically require a temperature setting of 99-100°F (37.2-37.8°C). Still air incubators, on the other hand, may require a slightly higher temperature, usually around 101-102°F (38.3-39°C), due to the natural stratification of warm air.
How to Calibrate Your Incubator Thermometer
Calibrating your incubator thermometer is essential to ensure accurate temperature readings. To calibrate, you can use the ice water method or boiling water method. For the ice water method, fill a container with ice and water, and insert the thermometer. The reading should be 32°F (0°C). For the boiling water method, submerge the thermometer in boiling water, and it should read 212°F (100°C) at sea level. Adjust your thermometer accordingly if there’s a discrepancy.
Monitoring and Maintaining Consistent Temperature
Consistent temperature is key to successful incubation. It’s crucial to monitor the temperature regularly and make adjustments as necessary. Most modern incubators come with digital temperature controls and alarms to alert you of any fluctuations. To maintain consistency, ensure that your incubator is placed in a stable environment, away from drafts and direct sunlight.
Troubleshooting Temperature Fluctuations
Temperature fluctuations can occur due to various reasons, including incubator design, environmental factors, or malfunctioning heating elements. If you notice temperature fluctuations, check the incubator’s heating element, ensure proper ventilation, and verify that the incubator is not too close to a wall or other heat sources. Refer to the table below for common issues and solutions:
| Issue | Cause | Solution |
|---|---|---|
| Temperature too high | Heating element malfunction | Check and replace the heating element if necessary |
| Temperature too low | Insufficient heating or poor insulation | Check insulation, ensure proper heating element function |
| Temperature fluctuations | Poor ventilation or environmental factors | Improve ventilation, relocate incubator if necessary |
By understanding the optimal temperature settings for your incubator and how to maintain a consistent temperature, you can significantly improve your hatch rates and ensure a successful incubation process.
Managing Humidity Levels Throughout the Incubation Process

Maintaining optimal humidity levels is crucial for successful chicken incubation. Humidity control is one of the five major functions involved in the incubation and hatching of chicken eggs.
Proper Humidity Levels for Different Incubation Stages
Different stages of incubation require specific humidity levels. Typically, the relative humidity should be around 50-60% for the first 18 days of incubation. During the final days (19-21), it’s recommended to increase the humidity to 65-70% to facilitate hatching.
It’s essential to understand that these are general guidelines, and the optimal humidity levels may vary slightly depending on the specific incubator model and environmental conditions.
Hygrometer Salt Test Calibration
To ensure accurate humidity readings, it’s crucial to calibrate your hygrometer regularly. One effective method is the salt test calibration. This involves placing a small amount of salt in a sealed container with the hygrometer to check if it reads 75% relative humidity, which is the equilibrium relative humidity over a saturated salt solution.
Wet Bulb vs. Relative Humidity Measurements
There are two primary methods of measuring humidity in incubators: wet bulb temperature and relative humidity. Wet bulb temperature is a measure that reflects the cooling effect of evaporation and is closely related to the incubator’s ability to manage humidity. Relative humidity, on the other hand, measures the percentage of water vapor in the air compared to the maximum amount the air can hold at a given temperature.
Understanding the difference between these two measurements is crucial for effective humidity control in chicken incubators.
Adjusting Humidity in Different Environments
The environment in which the incubator is placed can significantly affect its humidity levels. For instance, in dry climates, it may be necessary to increase the humidity inside the incubator, while in more humid environments, less additional moisture may be needed.
It’s also important to consider the incubator’s design and its inherent ability to retain or release moisture. Some incubators may require more frequent adjustments to maintain optimal humidity levels.
Egg Turning: Schedules and Best Practices

Proper egg turning is crucial for successful chicken incubation. Turning eggs ensures that the developing embryo remains healthy and develops properly.
Why Turning Is Critical for Development | Chicken Incubator Basics
Turning eggs is vital because it prevents the embryo from sticking to the shell membrane, allowing for even growth and development. Without regular turning, the embryo can become misshapen or fail to develop altogether.
The process of turning also promotes healthy blood vessel formation and ensures that the embryo is not compressed in one position for too long.
Manual vs. Automatic Turning Methods | Chicken Incubator Basics
There are two primary methods of egg turning: manual and automatic. Manual turning involves physically rotating the eggs by hand, usually several times a day. This method requires diligence and can be time-consuming but is cost-effective for small-scale incubation.
Automatic turning uses incubators equipped with turning mechanisms that rotate the eggs at set intervals. This method is more convenient and reduces the risk of human error, making it ideal for larger or more frequent incubation batches.
Optimal Turning Frequency and Angles | Chicken Incubator Basics
The frequency and angle of egg turning are critical for successful incubation. Eggs should be turned at least 3-5 times a day, with some recommendations suggesting turning every 4-6 hours for optimal results.
- The ideal turning angle is between 45 to 90 degrees.
- Turning should be done gently to avoid jolting the eggs.
- Consistency in turning is key to preventing developmental issues.
When to Stop Turning (Lockdown Period)
Egg turning should stop on day 18 of incubation, marking the beginning of the lockdown period. During this time, the incubator’s environment is adjusted to prepare for hatching, with a focus on maintaining high humidity and adequate ventilation.
Stopping egg turning at the right time allows the chick to properly position itself for hatching and ensures a smooth transition to the hatching phase.
Selecting and Storing Eggs Before Incubation

To ensure a high hatch rate, it’s essential to choose quality hatching eggs and store them under the right conditions. The process of incubation is highly sensitive to the initial quality of the eggs and how they are handled before being placed in the incubator.
Characteristics of Quality Hatching Eggs | Chicken Incubator Basics
Quality hatching eggs are those that are fertile, clean, and have the right shape and size for the breed. Eggs that are cracked, misshapen, or dirty are not ideal for incubation. The eggs should be collected frequently to prevent them from being dirty or broken.
Fertility is a critical factor, and it depends on the health and genetic makeup of the parent flock. Ensuring that the eggs come from a healthy, well-managed flock is crucial.
Proper Storage Conditions and Positioning | Chicken Incubator Basics
Eggs should be stored in a cool, humid environment. The ideal storage temperature is between 55°F to 60°F (13°C to 15°C), with a relative humidity of 70% to 80%. Eggs should be stored with the large end facing upwards to keep the yolk centered.
It’s also recommended to store eggs in a way that they are not touching each other, to prevent moisture from being trapped between them, which can lead to bacterial growth.
Maximum Storage Duration | Chicken Incubator Basics
The storage duration should be minimized to ensure the highest hatchability. Generally, eggs can be stored for up to 7 to 10 days before incubation, but the sooner they are incubated, the better. Prolonged storage can lead to a decline in hatchability.
| Storage Duration | Hatchability |
|---|---|
| 1-3 days | Highest |
| 4-7 days | High |
| 8-10 days | Moderate |
| More than 10 days | Low |
Preparing Eggs for Placement in the Incubator | Chicken Incubator Basics
Before placing the eggs in the incubator, they should be allowed to warm up to room temperature to prevent condensation. This process can take several hours, depending on the storage conditions.
It’s also a good practice to candle the eggs before incubation to check for any visible cracks or abnormalities, although this is more commonly done during incubation.
By carefully selecting and storing hatching eggs, you can significantly improve the chances of a successful hatch. Proper handling and storage conditions are crucial for maintaining the viability of the embryos until incubation begins.
Ventilation and Oxygen Requirements in Chicken Incubators

Ventilation plays a critical role in ensuring the health and development of embryos during incubation. It is one of the five major functions involved in the incubation and hatching of chicken eggs.
Understanding Oxygen and CO2 Balance | Chicken Incubator Basics
The balance between oxygen and carbon dioxide is crucial for the development of chicken embryos. Oxygen is necessary for the metabolic processes, while excessive CO2 can be harmful. Proper ventilation ensures that this balance is maintained.
- Oxygen supply is critical for embryo development.
- CO2 removal is essential to prevent toxicity.
- Ventilation systems help in maintaining the optimal gas exchange.
Proper Ventilation Throughout Incubation | Chicken Incubator Basics
Maintaining proper ventilation throughout the incubation period is vital. It involves ensuring that the incubator has adequate airflow to supply oxygen and remove CO2. The ventilation requirements may vary depending on the incubator model and the stage of incubation.
Some key considerations include:
- Ensuring that the incubator’s ventilation system is functioning correctly.
- Adjusting ventilation settings according to the incubation stage.
- Monitoring the incubator’s environment for signs of inadequate ventilation.
Adjusting Ventilation for Different Stages | Chicken Incubator Basics
The ventilation needs of the incubator change as the embryos develop. Adjusting ventilation settings is crucial to meet these changing needs.
| Incubation Stage | Ventilation Requirement |
|---|---|
| Early Incubation | Minimal ventilation to maintain temperature and humidity |
| Mid-Incubation | Moderate ventilation to balance oxygen supply and CO2 removal |
| Late Incubation | Increased ventilation to accommodate higher metabolic rates |
Signs of Inadequate Air Exchange | Chicken Incubator Basics
Inadequate ventilation can lead to several issues, including poor hatch rates and abnormal embryo development. Recognizing the signs of inadequate air exchange is crucial for timely intervention.
- High CO2 levels indicated by excessive moisture or fogging inside the incubator.
- Poor hatch rates or abnormal hatching patterns.
- Embryo development issues, such as malformations or mortality.
By understanding and managing ventilation effectively, incubator operators can significantly improve hatch rates and the overall health of the chicks.
Candling Chicken Eggs: Monitoring Development

The process of candling chicken eggs provides valuable insights into the health and development of embryos. By shining a light through the egg, you can observe the embryo’s growth and detect any potential issues early on.
Equipment Needed for Effective Candling | Chicken Incubator Basics
To candle eggs effectively, you’ll need a few simple pieces of equipment. A bright flashlight or a dedicated candling lamp is essential. Some people use a simple flashlight, while others prefer a more specialized candling device that can provide a more controlled light source.
Key equipment for candling includes:
- A bright light source (flashlight or candling lamp)
- A dark room to reduce glare
- A way to stabilize the egg (such as an egg carton or a candling tray)
Candling at Day 7: What to Look For
At day 7, the embryo’s development is quite pronounced. When you candle an egg at this stage, you should look for:
- A visible embryo with a developing vascular system
- Movement of the embryo (though this can be subtle)
- A darkening of the egg due to the growing embryo
Candling at Day 14: Assessing Progress
By day 14, the embryo has developed significantly. During candling, you should observe:
- A larger, more defined embryo
- Increased movement and potentially visible beak and claws
- The egg may appear darker due to the embryo’s growth
Identifying Viable vs. Non-Viable Eggs | Chicken Incubator Basics
Candling helps identify eggs that are not viable. Signs of non-viability include:
- No visible embryo or vascular system
- Embryo not moving
- Visible cracks or breaks in the shell
A comparison of viable and non-viable eggs at different stages can be summarized in the following table:
| Stage | Viable Egg Characteristics | Non-Viable Egg Characteristics |
|---|---|---|
| Day 7 | Visible embryo, vascular system, and movement | No embryo, no movement, or a ‘dark’ egg without visible structures |
| Day 14 | Larger embryo, more pronounced movement, and defined features | No development, or signs of decay |
By understanding what to look for during candling, you can improve your chances of a successful hatch by removing non-viable eggs from the incubation process.
The Lockdown Phase: Day 18 and Beyond

As incubation day 18 approaches, it’s crucial to prepare for the lockdown phase. This period is critical for the successful hatching of chicks, as it involves stopping egg turning and making adjustments to humidity and ventilation to support the hatching process.
Preparing for Lockdown | Chicken Incubator Basics
Preparation for lockdown involves several key steps. First, stop egg turning to allow the embryos to position themselves for hatching. Ensure that the incubator is clean and free from any debris that could interfere with the hatching process.
- Stop turning eggs at day 18.
- Clean the incubator thoroughly.
- Check that all systems are functioning correctly.
Adjusting Humidity for Hatching | Chicken Incubator Basics
During lockdown, humidity levels become even more critical. Increase humidity to around 65-70% to help the chicks pip and zip more easily.
“Higher humidity during the lockdown phase helps reduce the risk of dehydration in hatching chicks.”
To achieve this, you can add more water to the incubator’s water trays or adjust the humidity control settings.
Ventilation Considerations During Lockdown | Chicken Incubator Basics
While humidity increases, it’s also important to ensure adequate ventilation. Proper airflow helps remove excess carbon dioxide and supply oxygen to the hatching chicks.
Adjust the ventilation settings according to the manufacturer’s guidelines to maintain a healthy environment.
Setting Up the Hatcher or Hatching Area | Chicken Incubator Basics
If you’re using a separate hatcher, now is the time to set it up. Ensure it’s clean, preheated, and at the correct humidity and temperature settings.
- Preheat the hatcher to the same temperature as the incubator.
- Set the humidity according to the manufacturer’s instructions.
- Transfer eggs carefully to avoid damaging the embryos.
Hatch Day: What to Expect and How to Help
Successfully guiding chicks through the hatching process requires understanding what to expect on hatch day and how to provide assistance when needed. As the incubation period concludes, it’s crucial to be prepared for the challenges and excitement that come with hatch day.
Understanding Pipping and Zipping Processes | Chicken Incubator Basics
The hatching process involves two critical steps: pipping and zipping. Pipping occurs when the chick first breaks through the eggshell, creating a small hole. This is usually the first sign that hatching has begun. Zipping follows as the chick continues to break free from the shell by cracking it along the circumference. Understanding these processes helps you monitor the progress and identify any potential issues early.
When to Assist and When to Wait | Chicken Incubator Basics
It’s essential to strike the right balance between assisting the chick and allowing it to hatch naturally. Generally, it’s recommended to wait and observe, as most chicks can hatch without assistance. However, if a chick has pipped but is struggling to complete the hatch, gentle assistance may be necessary. It’s crucial to know when to intervene to avoid causing harm.
Dealing with Shrink-Wrapped Membranes | Chicken Incubator Basics
One complication that can arise during hatching is when a chick is “shrink-wrapped,” meaning the membrane surrounding the chick remains wrapped around its body after hatching. This condition can be life-threatening and may require careful removal of the membrane to free the chick. Understanding how to gently assist in such cases can be the difference between life and death for the chick.
Moving Newly Hatched Chicks to a Brooder | Chicken Incubator Basics
Once the chicks have hatched, they need to be moved to a brooder, a specialized enclosure that provides the necessary warmth, humidity, and safety. Preparing the brooder in advance ensures a smooth transition for the newly hatched chicks. It includes setting up appropriate heating, bedding, and ensuring the brooder is clean and safe.
By understanding the processes involved in hatch day and being prepared to provide the necessary care, you can significantly improve the chances of successful hatching and healthy chicks.
Egg Breakout Analysis: Learning from Failed Hatches

Egg breakout analysis is a critical step in identifying the causes of embryo death and improving hatch rates. This process involves examining eggs that fail to hatch to determine the reasons behind the failure. By understanding what went wrong, you can make necessary adjustments to your incubation process to improve future outcomes.
How to Perform a Proper Breakout Analysis | Chicken Incubator Basics
To perform a proper breakout analysis, you’ll need to carefully open the eggs that failed to hatch and examine their contents. This should be done in a well-lit area, and it’s helpful to have a magnifying glass or microscope for a closer look. Start by identifying the stage at which the embryo died, as this information can provide clues about what went wrong during incubation.
The process involves several key steps:
- Carefully open the egg to avoid damaging the contents.
- Examine the embryo or yolk sac for signs of development or abnormalities.
- Note the stage of development at which the embryo died.
- Look for any visible defects or issues that could have contributed to the embryo’s death.
Identifying Common Development Issues | Chicken Incubator Basics
During a breakout analysis, you may encounter several common development issues that can indicate problems during incubation. These can include:
- Abnormal embryo development, such as twisted necks or missing limbs.
- Embryo death at specific stages, which can point to issues like temperature fluctuations or inadequate turning.
- Signs of infection or contamination within the egg.
By identifying these issues, you can begin to understand what might have gone wrong during the incubation process.
Determining Causes of Embryo Death | Chicken Incubator Basics
Determining the causes of embryo death involves analyzing the findings from your breakout analysis and correlating them with your incubation parameters. Common causes include:
| Cause | Description |
|---|---|
| Temperature Fluctuations | Embryo death due to inconsistent incubator temperature. |
| Inadequate Turning | Failure to turn eggs regularly can lead to embryo death. |
| Humidity Issues | Incorrect humidity levels can affect embryo development. |
| Contamination | Bacterial or fungal contamination can kill embryos. |
Using Breakout Data to Improve Future Hatches
The insights gained from a breakout analysis can be invaluable in improving your future hatch rates. By understanding the causes of embryo death, you can make targeted adjustments to your incubation process, such as improving temperature control, adjusting humidity levels, or enhancing egg turning protocols.
Regularly conducting egg breakout analyses and acting on the findings can lead to significant improvements in your hatch rates over time. It’s a crucial practice for anyone serious about optimizing their incubation outcomes.
Improving Your Hatch Rate Over Time
Improving your hatch rate at home requires attention to detail, patience, and a willingness to learn from each incubation experience. By optimizing incubation conditions and troubleshooting common issues, you can increase your chances of successful hatches.
One key factor in improving hatch rate is maintaining consistent temperature and humidity levels. Refer to the guidelines provided in the Beginner’s Guide to Incubation for optimal settings. Regularly checking and calibrating your incubator’s thermometer and hygrometer is also crucial.
Another important aspect is egg turning and ventilation. Ensuring that eggs are turned regularly and that the incubator has proper airflow can significantly impact hatch rate. By following the tips and best practices outlined in previous sections, you can create an ideal environment for your eggs to develop.
Analyzing the results of each hatch, including performing egg breakout analyses, can help identify areas for improvement. By applying these insights, you can refine your incubation techniques and improve your hatch rate over time.
FAQ
What is the ideal temperature for a chicken incubator?
The ideal temperature for a chicken incubator is between 99°F and 100°F, with some incubators requiring a temperature of 101°F to 102°F. It’s essential to check the manufacturer’s guidelines for specific temperature requirements.
How often should I turn eggs in a chicken incubator?
Eggs should be turned at least 3 to 5 times a day, with some automatic incubators turning eggs as frequently as every hour. Turning helps prevent the embryo from sticking to the shell.
What is the importance of humidity in a chicken incubator?
Humidity is crucial in a chicken incubator as it helps maintain the health and development of the embryo. The ideal humidity level varies throughout the incubation period, typically ranging from 50% to 65% relative humidity.
How do I calibrate my incubator’s thermometer?
To calibrate your incubator’s thermometer, submerge it in a mixture of ice and water (32°F) or use a thermometer calibration device. Adjust the thermometer accordingly to ensure accurate temperature readings.
What are the benefits of using a forced air incubator?
Forced air incubators provide a more consistent temperature and humidity level throughout the incubator, promoting healthy embryo development. They also help reduce the risk of temperature fluctuations.
How do I know if my eggs are fertile?
Fertile eggs can be identified by candling, which involves shining a light through the egg to visualize the embryo’s development. Fertile eggs will typically show a dark spot or a network of blood vessels.
What is the lockdown phase in chicken incubation?
The lockdown phase, typically occurring on day 18 of incubation, involves stopping egg turning and adjusting humidity levels to prepare for hatching. This phase helps the chick prepare for pip and hatch.
How do I perform an egg breakout analysis?
An egg breakout analysis involves examining unhatched eggs to determine the cause of embryo death or failure to hatch. This analysis can help identify issues with incubation conditions, egg quality, or other factors.
What are the signs of inadequate air exchange in a chicken incubator?
Signs of inadequate air exchange include excessive CO2 levels, reduced hatch rates, and abnormal chick development. Proper ventilation is essential to maintain a healthy environment for the developing embryos.
How can I improve my hatch rate over time?
To improve your hatch rate, focus on optimizing incubation conditions, including temperature, humidity, and ventilation. Regularly clean and maintain your incubator, and consider using a hygrometer and thermometer to monitor conditions.
How long does hatching take?
Most chicken eggs hatch around day 21, but timing can shift if eggs were stored longer or temperatures ran slightly low.
When do I stop turning eggs?
Stop turning at lockdown (around day 18) so chicks can position to pip and zip.
Should I help a chick out of the shell?
Usually no—helping too early can cause bleeding or harm; focus on correct humidity and patience during the hatch window.
Why did chicks hatch late?
Late hatch often relates to slightly low average temperature, extended egg storage, or frequent lid-opening that cools eggs repeatedly.
Can I hatch different bird species together?
It’s possible, but it complicates temperature/humidity targets and timing, so beginners should hatch one species per run.
Conclusion of: Chicken Incubator Basics
Getting good hatches isn’t luck—it’s repeatable management, and a chicken incubator makes that possible when you control the environment more consistently than a broody hen. The goal is simple: keep embryos warm, keep moisture loss on track, keep eggs moving, and keep air fresh without wild swings. This guide walks you through the settings that matter most and the practical habits that prevent “mystery” hatch failures. NC State Extension: setting up an incubator
What the incubator is really doing
A chicken incubator is basically a tiny climate chamber that replaces the hen’s body heat, moisture, and daily egg movement while embryos grow for about 21 days. Because embryos develop on a schedule, small mistakes repeated for days (like low humidity or a thermometer reading wrong) add up more than a single short disturbance. If you think of incubation as “managing moisture loss and stable heat,” your decisions get clearer fast. UC ANR: the science of incubation (PDF)
Selecting eggs that can hatch
A chicken incubator can’t fix infertile eggs or poor egg quality, so start with clean, normal-shaped eggs from healthy, well-fed breeding stock where roosters are present. Avoid cracked shells, heavily soiled eggs, and odd sizes because they’re more likely to dehydrate, contaminate neighbors, or produce weak chicks. If you’re buying hatching eggs, ask about breeder nutrition, flock age, and how eggs are collected and stored. UC Davis Avian: poultry fact sheet (PDF)
Before eggs ever go into a chicken incubator, handling matters: keep eggs out of hot cars, don’t scrub shells, and don’t “wash to make them safe” because that can remove the protective cuticle and spread bacteria. Plan your hatch date, then set eggs that are no more than about a week old whenever possible so embryos don’t start weak. If eggs must be stored longer, turning them during storage can help reduce early embryo losses.
Storage before setting (and warming up)
If you’re holding eggs for a chicken incubator, aim for cool—not cold—storage with moderate humidity so embryos pause safely without drying out. Bring eggs to room temperature before setting so you don’t create condensation that pulls bacteria through the shell. Keep a simple log: date collected, storage conditions, and date set, because later troubleshooting is much easier when you can see patterns. Ohio State University Extension: incubating eggs (PDF)
Pre-run your incubator like you mean it
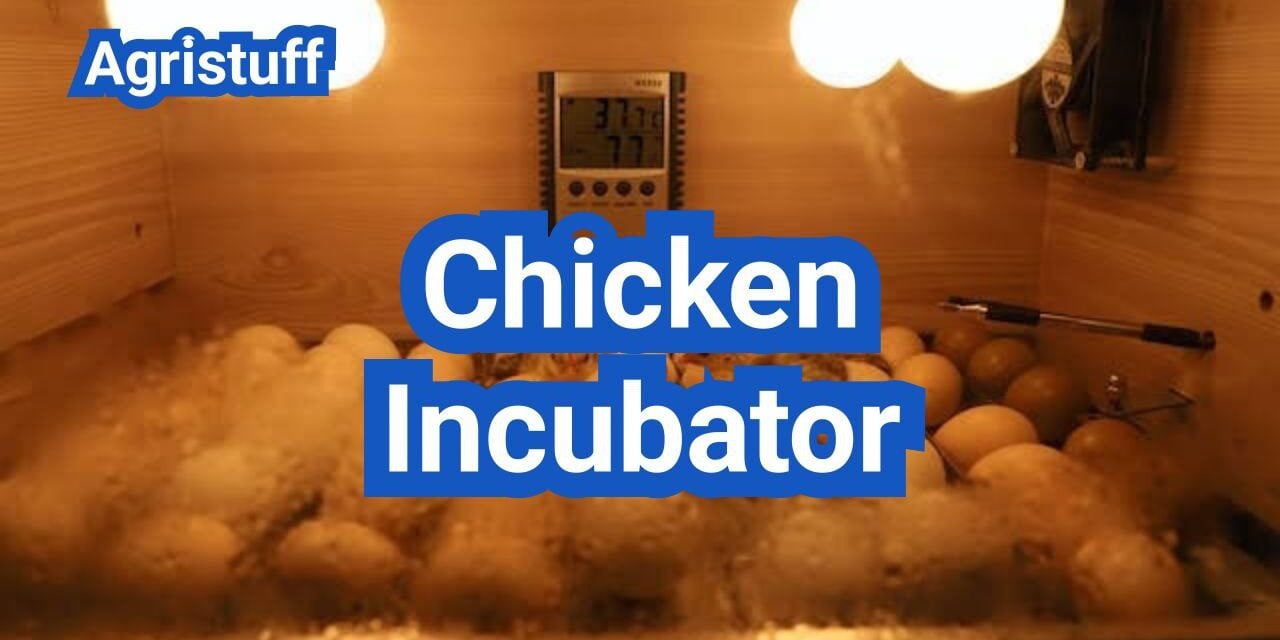
Run the chicken incubator empty for at least 24 hours (longer is better) to prove it can hold steady temperature and humidity where you plan to keep it. Place it away from drafts, direct sun, heating vents, and busy foot traffic—“stable room” beats “fancy machine” every time. During the test run, verify that the sensor reading matches the temperature at egg height, not the display on the lid. University of Nebraska–Lincoln Extension: incubation guidelines (PDF)
Temperature: the non-negotiable
Temperature is the number-one driver of success in a chicken incubator, and the “right” set point depends on whether you have forced air or still air. Many forced-air units run best around the high-99s°F at egg level, while still-air units are often set higher because heat stratifies and egg-level readings can lag behind lid readings. Overheating is typically more damaging than mild underheating, so prioritize accuracy and stability over constant knob-turning. Virginia Tech (archived): incubating eggs (PDF)
To run a chicken incubator with confidence, measure temperature where the eggs sit, then keep the environment steady and avoid frequent lid opening that causes sharp drops and rebounds. Use at least two thermometers at first and compare readings; if they disagree, you don’t have “more information,” you have uncertainty. Once you trust your instruments, make small changes and give the system time to stabilize rather than chasing every short-term fluctuation. Kansas State University: thermometer calibration guide (PDF)
Humidity: manage moisture loss, not a single number
Humidity in a chicken incubator matters because embryos must lose a controlled amount of water so the air cell grows and the chick can breathe internally before pipping. Too dry can “shrink-wrap” chicks in tough membranes, while too wet can leave chicks oversized with poor air cell development and weak hatching progress. Think of early incubation as “steady moisture loss” and late incubation as “help the chick finish the job.” UConn Poultry Extension: helpful incubation hints
Because inexpensive meters can be off, a chicken incubator humidity plan should include a reality check—especially in very dry winter heat or arid climates where evaporation skyrockets. If your hygrometer is questionable, calibrate it with a simple salt test, then adjust humidity by changing water surface area rather than constantly misting. Warm water helps maintain internal temperature when topping up reservoirs, but don’t pour water onto eggs. North Dakota State University Extension: measuring humidity and calibrating hygrometers
Turning: your daily insurance policy
Turning prevents the embryo from sticking to membranes and supports normal development, so a chicken incubator routine should include turning multiple times daily (or a reliable automatic turner). Mark eggs with a simple X and O if you’re hand-turning, and turn an odd number of times per day so embryos don’t rest overnight in the same position. Stop turning when you enter “lockdown” so the chick can orient for pipping. University of Missouri Extension: incubation of poultry eggs
Ventilation: oxygen matters more as embryos grow
Even a perfect chicken incubator temperature can’t overcome stale air, because embryos consume oxygen and produce carbon dioxide—especially late in incubation. Keep vents open as recommended for your model, avoid sealing the unit “to hold heat,” and don’t place the incubator in a tiny, closed closet where air exchange is limited. Good ventilation should be steady and gentle, not a cold draft blowing across eggs. Virginia Cooperative Extension: Beginning of Life (PDF)
Candling: check progress without over-handling
Candling helps you confirm development in a chicken incubator and remove clear or quit eggs that can rot and contaminate the hatch. Candle quickly in a dim room, keep eggs warm by limiting time out, and compare what you see to typical development timing rather than expecting every egg to look identical. When in doubt, re-candle later instead of repeatedly opening the incubator to “double-check.” Illinois Extension: candling eggs
Lockdown and hatch: where many hatches are won or lost
Lockdown starts near day 18 in a chicken incubator: stop turning, keep vents appropriately open, and raise humidity slightly so membranes stay flexible during pipping. Arrange eggs on their sides (or as your tray system requires) and make sure water channels are filled before you close the lid for the final stretch. The biggest rule is simple: once pipping begins, avoid opening the incubator unless there’s a true emergency. NC State Extension: incubator setup checklist (PDF)
During hatch, a chicken incubator may look “too humid,” “too quiet,” or “too slow,” but many chicks need hours to go from first pip to zipping and emerging. After a chick hatches, leave it until it’s fluffy and dry; removing wet chicks early can chill them and crash humidity for unhatched eggs. Move dry chicks to a pre-warmed brooder with safe heat, water access, and good footing to prevent leg issues. University of Maryland Extension: hatching eggs at home
Troubleshooting: diagnose like a hatchery tech
When a chicken incubator hatch rate is low, resist the urge to blame a single factor and instead use a simple “process audit” approach: egg quality, storage, temperature accuracy, humidity trend, turning consistency, and sanitation. Early embryo deaths often trace back to infertile eggs, poor storage, contamination, or temperature swings in the first week. The fastest improvement usually comes from instrument validation and better pre-run testing rather than big setting changes mid-hatch. University of Florida IFAS Extension: solving hatchability problems
Late deaths and weak chicks in a chicken incubator often point to humidity mismanagement (bad air cell growth), ventilation problems, or turning mistakes earlier in the process. If chicks pip but can’t finish, membranes may be too dry (“shrink-wrap”), while overly wet conditions can leave chicks with insufficient air cell space to breathe and complete the zip. If you do a careful post-hatch breakout analysis, you can match patterns (like malpositions or sticky chicks) to the most likely management errors and fix them on the next run.
Cleaning and biosecurity: protect chicks and your flock
A chicken incubator becomes a bacteria-and-dust magnet, so cleaning after every hatch is not optional if you want consistent results. Remove all debris, scrub surfaces with soap and water first, then disinfect (many guides use a diluted bleach solution) and allow the unit to dry completely before storing or running again. Pay extra attention to trays, corners, fans, and water channels where biofilm can build up unnoticed. Illinois Extension: incubation and embryology Q&A
Because chicks and hatch debris can carry germs, treat a chicken incubator hatch like a basic food-safety moment: wash hands, keep kids from kissing chicks, and avoid bringing new chicks into contact with your established flock without a plan. If you’re shipping or selling birds, take biosecurity seriously—clean boots, dedicated equipment, and controlled traffic flow matter even on small farms. Reducing disease risk protects both animal welfare and your long-term production goals.
Quick checklist of Chicken Incubator Basics
- Test-run the incubator for 24+ hours before setting eggs.
- Place the incubator on an inside wall, away from sun, drafts, and vents.
- Verify temperature at egg height with a trusted thermometer.
- Confirm humidity readings (calibrate the hygrometer if needed).
- Set only clean, normal eggs from a flock with roosters present.
- Warm eggs to room temperature before setting to avoid condensation.
- Turn eggs consistently (or confirm the auto-turner is working).
- Keep vents appropriately open for fresh air exchange.
- Stop turning at lockdown and raise humidity slightly for hatch.
- Do not open the incubator during pipping/zipping unless necessary.
- Clean and disinfect the incubator after every hatch.
Common mistakes to avoid | Chicken Incubator Basics
- Trusting the built-in display: verify readings at egg height with a known thermometer/hygrometer.
- Constantly “adjusting” settings: make small changes and give the incubator time to stabilize.
- Opening the lid too often: handle eggs quickly and candle with a plan to limit heat/humidity loss.
- Incorrect turning: turn an odd number of times per day and stop at lockdown.
- Humidity guesswork: adjust water surface area rather than random misting.
- Setting dirty or cracked eggs: cull them to protect the rest of the batch from contamination.
- Poor location choice: avoid garages, windowsills, and rooms with big day/night temperature swings.
- Skipping sanitation: scrub first, then disinfect; debris left behind defeats disinfectants.
Costs and ROI snapshot for Chicken Incubator Basics
For most small farms, a chicken incubator budget is driven by capacity (how many eggs per hatch), build quality (insulation and seal), and whether you need automation like an egg turner or external humidity control. Add the small-but-real costs of replacement parts, extra thermometers, cleaning supplies, and brooder setup, because successful hatching includes the first day of chick care. A practical ROI lens is “cost per healthy chick,” which depends on fertility, hatch rate, and how many batches you run each season. UC ANR: incubator size and selection considerations (PDF)
On the operating side, a chicken incubator has predictable costs (electricity, water, consumables) and hidden costs (your time, learning curve, and the occasional failed batch). If you’re expanding beyond a hobby hatch, financing options for equipment can matter more than chasing the cheapest unit, especially if better stability raises hatch rate and chick quality over time. For U.S. farms and rural businesses, it can be worth reviewing small-loan options that fit equipment purchases and short-term working capital needs.
Electricity use for a chicken incubator varies by model size, insulation, room temperature, and how often the lid is opened, so the same unit can cost noticeably more to run in a cold barn office than in a stable, conditioned room. If you want a realistic estimate, track wattage (or use a plug-in meter) during a full test run, then multiply by your local rate to compare “true cost per hatch” across setups. This kind of simple measurement keeps you from underestimating overhead when you scale up from a few eggs to regular batches. U.S. Energy Information Administration: electricity data
Final thought
A chicken incubator rewards the same mindset as good farming: measure, keep records, change one thing at a time, and repeat what works. If you focus on accurate temperature at egg level, steady humidity trends, consistent turning, and clean equipment, you’ll outperform most “trial-and-error” hatches and produce stronger chicks with fewer emergencies.
Sources & References
- Texas A&M AgriLife Extension: Incubating and Hatching Eggs (PDF)
- Texas A&M AgriLife: Hatching Eggs in the Classroom (Teacher’s Guide PDF)
- Illinois Extension: Incubation and Embryology overview (PDF)
- Illinois Extension: Incubation & Embryology FAQs (PDF)
- UConn: Helpful Hints for Teachers on Incubation (PDF)
- Alabama Cooperative Extension: Chicken Embryo Development
- LSU AgCenter: Hatching Eggs
- Utah State University Extension: Hatchery Sanitation and Biosecurity (PDF)
- Michigan State University: Embryology Help Guide (Beginner PDF)
- NC State Extension: Embryology worksheets (PDF)
- Colorado State University Extension: Embryology worksheets (PDF)


